A solar charge controller regulates energy flow from solar panels to batteries, preventing overload and ensuring efficient charging. Essential for maintaining battery health and system performance safely.
What is a Solar Charge Controller?
A solar charge controller is a critical component in solar energy systems, regulating the flow of energy from solar panels to batteries. It prevents overcharging, protects against reverse current, and ensures optimal energy transfer. Available in types like MPPT and PWM, it efficiently manages power, safeguarding battery health. With features like electronic protections and monitoring capabilities, it serves as the backbone of solar systems, ensuring reliability and efficiency while maintaining electrical safety and system performance. Proper setup and configuration are essential for maximizing its functionality and longevity.
Why is a Solar Charge Controller Important?
A solar charge controller is vital for protecting batteries from overcharging and reverse current, ensuring safe and efficient energy management; It regulates power flow from solar panels to batteries, preventing damage and extending battery lifespan. By maintaining optimal charging levels, it enhances system performance and reliability. With built-in protections like overcharge prevention and short-circuit protection, it safeguards the entire solar setup. This ensures consistent energy supply and protects investments in solar panels and batteries, making it an indispensable component for any solar energy system.

Types of Solar Charge Controllers
Solar charge controllers are primarily MPPT (Maximum Power Point Tracking) and PWM (Pulse Width Modulation) types, with MPPT offering higher efficiency, up to 99%, for optimal energy harnessing.
MPPT (Maximum Power Point Tracking) Charge Controllers
MPPT charge controllers are the most efficient type, offering up to 99% tracking efficiency. They optimize energy harvest by continuously adjusting to solar panel and battery conditions, ensuring maximum power transfer. Unlike PWM controllers, MPPT systems excel in varying temperatures and light levels, making them ideal for dynamic environments. Advanced models like the Renogy Rover 40A MPPT controller feature real-time monitoring and fault data transmission via Modbus RTU, enhancing system performance and reliability. This technology is crucial for maximizing solar energy utilization in both small and large-scale systems.
PWM (Pulse Width Modulation) Charge Controllers
PWM charge controllers are cost-effective and suitable for small to medium solar systems. They regulate battery charging by switching the power supply on and off rapidly, ensuring optimal energy transfer. Equipped with 8 electronic protections, PWM controllers prevent overcharging, short circuits, and reverse polarity. These controllers are user-friendly and reliable, making them ideal for beginners. While less efficient than MPPT models, PWM controllers are durable and ideal for simpler setups, offering consistent performance without advanced monitoring features, making them a practical choice for basic solar energy needs.

Installing Your Solar Charge Controller
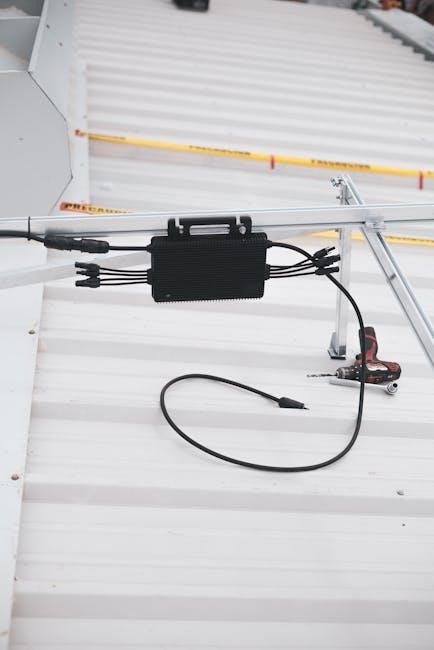
Installing a solar charge controller involves several key steps to ensure safe and efficient operation. Begin with pre-installation checks to verify compatibility and safety. Mount the controller in a dry, cool location, typically near the battery bank for shorter connections. Secure it using provided brackets or screws. Connect solar panels to the controller using MC4 connectors, ensuring correct polarity to avoid damage. Then, connect the battery, matching positive and negative terminals carefully. Configure controller settings like battery type and system voltage. Finally, test the system to confirm proper operation, using tools like a multimeter to check voltage and current readings. This process ensures your solar system functions optimally and safely. Always follow the manufacturer’s instructions for specific details.
Pre-Installation Checks
Before installing your solar charge controller, perform essential checks to ensure a seamless setup. Verify the controller’s compatibility with your solar panels and battery type. Check the maximum power point tracking (MPPT) efficiency if applicable. Inspect all cables and connectors for damage or corrosion. Ensure the system voltage matches the controller’s specifications. Review the manual for specific requirements. Properly plan the layout to minimize cable lengths, reducing energy loss. Ensure the installation site is well-ventilated and protected from moisture. Finally, disconnect all power sources before starting work to maintain safety.
Mounting the Solar Charge Controller
Mount the solar charge controller in a cool, dry, and well-ventilated area to prevent overheating. Use screws or a mounting bracket to secure it firmly to a flat surface. Ensure the device is level and accessible for future maintenance. Keep it away from flammable materials and direct sunlight to avoid damage. For optimal performance, avoid installing it near batteries or other heat sources. Follow the manufacturer’s guidelines for specific mounting requirements. Ensure all connections are easily accessible for monitoring and adjustments. Proper mounting ensures reliability and longevity of the charge controller.
Connecting Solar Panels to the Charge Controller
Connect solar panels to the charge controller using compatible MC4 connectors or adapters. Ensure the positive panel wire connects to the controller’s positive terminal and the negative to the negative terminal. Securely tighten all connections to prevent loose contacts. For Renogy systems, use the provided 10AWG MC4 Adaptor Kit for a reliable connection. Double-check the polarity to avoid damage. Turn off power before connecting. After securing, verify all connections are tight and protected from water or moisture. Properly connected panels ensure efficient energy transfer to the charge controller. Always follow the manufacturer’s wiring diagram for specific configurations.
Connecting the Battery to the Charge Controller
Connect the battery to the charge controller by matching the positive terminal on the battery to the positive terminal on the controller, and the negative to the negative. Use high-quality cables with the correct gauge to minimize resistance. Ensure the battery is fully disconnected from other systems before connecting. Tighten all terminals securely to avoid loose connections. Refer to your controller’s manual for specific wiring diagrams. Double-check polarity to prevent damage. Turn off power sources before making connections. Proper battery connection ensures safe and efficient charging and discharging cycles.
Setting Up Charge Controller Parameters
Set the charge controller parameters according to your system requirements. Use the LCD display or app to configure settings like battery type, voltage, and charging modes; Input the correct maximum charging current and voltage limits. Enable features like equalization or boost charging if necessary. Set the depth of discharge (DOD) to protect the battery. Refer to the manual for default settings or customize based on your battery specifications. Save changes to ensure optimal charging and discharging. Proper parameter setup ensures efficient energy management and prolongs battery life. Always double-check settings before finalizing.
Testing the System
After installation, test the system to ensure proper functionality. Check the solar panel output voltage and current using a multimeter. Verify the battery voltage and charging current displayed on the charge controller. Ensure the controller is regulating power effectively and not overheating. Monitor the system under different conditions, such as full sun and partial shade, to observe performance. Test the low-voltage disconnect (LVD) by draining the battery to ensure it disconnects correctly. Confirm all indicators and alarms are functioning as expected. Testing ensures the system operates safely and efficiently, providing reliable energy storage and distribution.

Using and Monitoring Your Solar Charge Controller
Regularly monitor the charge controller to ensure optimal performance. Check the display for voltage, current, and charging status. Adjust settings as needed for efficient energy management.
Starting Up the System
To start up your solar charge controller, ensure all connections are secure and the system is properly configured. Turn on the device and check the display for initial readings. The controller will begin monitoring solar input and battery status. Allow a few minutes for the system to stabilize and initialize. Observe the LED indicators to confirm normal operation. If the system does not power up, verify power sources and connections. Once operational, the controller will automatically regulate energy flow between panels, battery, and load. Ensure all settings align with your system requirements before full operation.
Monitoring Charge Controller Performance
Regularly monitor your solar charge controller to ensure optimal performance. Check the display screen for real-time data, including solar input, battery voltage, and charging current. Observe LED indicators to confirm system status. Review historical data to track energy production and battery health. Ensure all settings remain accurate and adjust as needed. Monitoring helps identify potential issues early, such as low efficiency or hardware faults. Use the controller’s built-in monitoring features to maintain peak performance and extend system lifespan. This step is crucial for maximizing energy harvest and ensuring reliable operation. Always refer to the manual for specific monitoring guidelines.
Adjusting Settings for Optimal Performance
To optimize your solar charge controller, start by reviewing the available settings in the manual. Adjust the charging voltage and current limits based on your battery type, ensuring they match the manufacturer’s recommendations. Configure settings like bulk, absorption, and float voltages for proper charging. Enable temperature compensation if necessary to account for environmental fluctuations. Set low voltage cutoffs to protect your battery from over-discharging. Monitor the system’s performance using the controller’s display or monitoring software to assess the impact of your adjustments. Make incremental changes and observe results to ensure optimal energy management without risking system damage.

Troubleshooting Common Issues
Troubleshooting common issues with your solar charge controller involves identifying error codes, checking connections, and ensuring proper system setup. Always refer to the manual for specific solutions to address malfunctions effectively and safely.
Identifying Common Problems
Identifying common problems with your solar charge controller starts with understanding error codes, unusual LED patterns, or system performance issues. Overcharging, undercharging, or overheating are frequent concerns. Check for loose connections, damaged wiring, or incorrect settings. Low battery levels may indicate poor charging efficiency or high discharge rates. Faulty sensors or mismatched components can also cause malfunctions. Always consult the manual to interpret error codes and perform basic checks before advanced troubleshooting. Regular monitoring helps catch issues early, ensuring optimal system performance and longevity.
Understanding Error Codes
Understanding error codes is crucial for diagnosing and resolving issues with your solar charge controller. Error codes like “E01” or “E02” typically indicate specific problems, such as system faults or overtemperature conditions. Refer to the manual for a detailed list of codes and their meanings. Address the root cause before resetting the controller. If issues persist, contact support for assistance. Regularly reviewing error codes helps maintain system efficiency and prevents recurring problems. Always ensure proper connections and settings to minimize error occurrences. Timely resolution ensures optimal performance and extends the controller’s lifespan.
Resetting the Charge Controller
Resetting your solar charge controller can resolve software-related issues or revert it to factory settings. First, ensure the system is powered off to avoid any electrical risks. Locate the reset button, typically found on the rear or front panel. Press and hold the button for 5-10 seconds until the LED indicators flash, signaling a reset. Release the button and allow the controller to restart. Note that resetting may erase custom settings, so reconfigure parameters afterward. If issues persist, consult the manual or contact technical support for further assistance.

Maintenance and Care
Regular maintenance ensures optimal performance. Clean the controller to prevent dust buildup and inspect for wear or damage. Store it in a cool, dry place when not in use.
Cleaning the Charge Controller
Cleaning your solar charge controller is essential for maintaining efficiency. Use a soft, dry cloth to wipe away dust and debris from the surface. Avoid harsh chemicals or abrasive materials that could damage the finish or harm electrical components. For tougher stains, lightly dampen the cloth with distilled water, but ensure no moisture enters the controller. Regular cleaning prevents overheating and ensures proper airflow. Never spray liquids directly on the unit. Cleaning should be done with the controller turned off to prevent electrical hazards. This simple maintenance step prolongs the lifespan and reliability of your device.
Updating Firmware
Regular firmware updates ensure your solar charge controller operates with the latest features and improvements. Check the manufacturer’s website for updates. Download the firmware to a compatible computer. Connect the controller to your PC using a USB or serial cable. Follow the on-screen instructions to initiate the update. Avoid interrupting the process to prevent corruption. Once complete, verify the firmware version matches the update. If issues arise, refer to the user manual or contact support. Updated firmware enhances performance, security, and compatibility, ensuring optimal energy management for your solar system.
Storing the Charge Controller
Proper storage of your solar charge controller ensures longevity and functionality. Store it in a cool, dry place away from direct sunlight and moisture. Use the original packaging if available to protect against physical damage. Avoid exposing the controller to extreme temperatures or humidity. Disconnect it from all power sources before storage. Keep it away from children and pets. Clean the controller before storing to prevent dust buildup. Follow these steps to maintain its performance and extend its lifespan when not in use.

Safety Considerations
Always handle the charge controller with care to avoid damage. Ensure proper installation and operation to prevent hazards. Follow all important safety guidelines provided.
Electrical Safety Precautions
Always wear protective gear, such as gloves and safety glasses, when handling electrical components. Avoid overloading circuits and ensure proper grounding of the system to prevent electrical shocks. Never work on the charge controller while it is connected to live solar panels or batteries. Keep the area dry to avoid short circuits. Disconnect power sources before performing maintenance or repairs. Use tools rated for the task to prevent damage or injury. Always follow the manufacturer’s installation and safety guidelines to ensure safe operation. These precautions are essential to prevent electrical hazards and ensure system reliability.
Handling and Storage Safety
Always handle the solar charge controller with care to avoid physical damage. Store it in a cool, dry place, away from direct sunlight and moisture. Use protective packaging to prevent scratches or impacts during transportation. Avoid stacking heavy objects on top of the controller. Keep it out of reach of children and pets. Ensure the device is completely disconnected before storage. Follow the manufacturer’s guidelines for proper handling and storage to maintain its lifespan and reliability. Proper care ensures optimal performance when the controller is reinstalled.

Warranty and Support
Your solar charge controller is backed by a manufacturer’s warranty covering parts and labor for a set period. Contact customer support via phone, email, or online chat for assistance. Register your product and refer to the warranty document for details.
Understanding Your Warranty
Your solar charge controller typically comes with a manufacturer’s warranty, covering defects in materials and workmanship for a specified period, often 2-5 years. The warranty may vary depending on the model and brand, so review the terms carefully. Generally, it covers repairs or replacements for faulty components, excluding damage from improper installation or misuse. Ensure you register your product to validate the warranty. Keep the purchase receipt and documentation handy for any claims. Understand the conditions to ensure your warranty remains valid and provides the necessary protection for your investment.
Contacting Customer Support
If you have questions or issues with your solar charge controller, contact the manufacturer’s customer support team. Most companies provide support via phone, email, or live chat through their official website. Before reaching out, have your product’s model number, purchase date, and a detailed description of the issue ready. Check the manual or product packaging for contact information. Visit the manufacturer’s website for support options, including FAQs or troubleshooting guides. Ensure you have all necessary details to expedite assistance. Prompt and reliable support is typically available to address your concerns effectively.
Final Tips for Effective Use
Always monitor your solar charge controller’s performance to ensure optimal energy harvesting. Regularly inspect connections for wear or corrosion. Adjust settings seasonally to match solar conditions. Keep the unit cool and dry to prevent overheating. For maximum efficiency, clean solar panels periodically. Familiarize yourself with error codes to address issues promptly. Refer to your manual for model-specific optimizations. By following these tips, you’ll extend the lifespan of your system and enjoy reliable renewable energy performance. Remember to update firmware when available for enhanced functionality.

Additional Resources
Explore official manufacturer websites, forums, and YouTube tutorials for detailed guides and troubleshooting tips. Download PDF manuals for specific models to access comprehensive setup instructions and technical specifications.
Recommended Reading
For deeper insights, explore books like “Solar Power Your Home for Dummies” and “Off-Grid Solar”, which offer practical advice on solar systems. Visit reputable websites such as Renewable Energy Hub or SolarPower Europe for detailed guides. Manufacturer-specific manuals, like those from Renogy or Victron, provide tailored instructions. Online forums like Solar Panels Forum or Reddit’s r/solar community share real-world experiences and troubleshooting tips. These resources complement this manual, offering advanced techniques and system optimization strategies for maximizing your solar charge controller’s efficiency and longevity.